Self Hosting
Besides cloud servers, We offer you a way to self-host the server. This means the server data is to be put to your machine (or another VPS providers) to host a website online. Self hosted feature is completely free and it's a great option for:
- Devops, who behind a corporate rule that mandates all data is self hosted to an on-premise server
- Developers, who finds our cloud services is not speedy enough or like to rent VPS elsewhere
- Hobbyst, who like a taste being sysadmins on their own gearbox
Comparisons
DOM Cloud vs Other VPS Providers
We don't sell VPS because actually we rent VPS from mixes of cloud provides. DOM Cloud main selling point is the price-to-performance and great developer budget.
Logically, it's much cheaper if you rent VPS elsewhere and just run our free installation script. But DOM Cloud offers much more than the software inside the VPS. We could imagine this better by comparing our self-hosted installations script to the one that most people adore: Coolify.
DOM Cloud vs Coolify
Coolify is (quoted) an open-source & self-hostable Heroku / Netlify / Vercel alternative. It's a cool piece of software to boot up any VPS to any kind of site with a single click.
If you think of it, Using DOM Cloud with self hosted does exactly the same thing as running Coolify. And both script is offered free. However in the technical side it's very different.
First, DOM Cloud Portal (https://my.domcloud.co) is still online even if your server down. If your sysadmin doing something wrong, you always gonna notice it in deployments log — because the other ways to access it like using SSH and databases are never given in "root" mode.
Second, DOM Cloud servers is controlled using DOM Cloud Bridge which is a headless REST API. The REST API is used by DOM Cloud Portal to perform deployments. Unlike Coolify, DOM Cloud servers do not use Docker and efficiently repurpose idle traffic. This means our system requirement is waaay lower — even DOM Cloud Portal (https://my.domcloud.co) runs fine with 1GB RAM of VPS right now.
Third, you get so many admin features working out of the box, things like virtualmin, database, online tools, etc.
Self-Hosted vs Our Cloud Offering
All software exists in the cloud should be the same as we offer in the self-hosted version. But some exception exists:
- Backup. Backup requires S3 key, and we don't give our S3 keys to self hosted servers for security reason. You can add your own S3 key as Backup account in virtualmin backups with
domcloud-backupsas the bucket name. - DNS. DNS that propagates to nsp.domcloud.co / nss.domcloud.co* only works inside our cloud servers for security reason. You must setup your own DNS servers. This also can be configured using Webmin.
- Free domains. Free domain like
.dom.my.idand.domcloud.devonly allowed with cloud servers for security reason. You must use your own domains.
Installation
DOM Cloud servers are just a Linux server with some preinstalled software. This section is the guide for installing DOM Cloud software from a freshly installed VPS. We hosted our installation steps in GitHub: https://github.com/domcloud/container.
The DOM Cloud server can be installed either from latest Rocky Linux 9 or Ubuntu 24 LTS Server. The server requirement is pretty small, you may run it on systems with capacity as low as 2GB of RAM and 30 GB of SSD.
After your VPS or Server running, run this as root (sudo -i):
if [ -f /etc/lsb-release ]; then OS=ubuntu; elif [ -f /etc/redhat-release ]; then OS=rocky; else OS=unknown; fi
curl -sSL https://github.com/domcloud/container/raw/refs/heads/master/install-$OS.sh | bash
curl -sSL https://github.com/domcloud/container/raw/refs/heads/master/preset.sh | bash
If you can't wait for installation to complete, use tmux and rerun the scripts above.
After it success, reboot and run this to reset passwords:
curl -sSL https://github.com/domcloud/container/raw/refs/heads/master/genpass.sh | bash
# Take note webmin password generated from this script
The script installs:
- Virtualmin 7
- DOM Cloud's Bridge and Proxfix
- NGINX and Passenger — Custom built described in NGINX Builder
- MariaDB, PostgreSQL and Valkey
- Multiple PHP versions installing from REMI repo or and Composer
- NodeJS, Ruby, Python installing from Rocky repo including NPM, Yarn, Pip and Pipenv
- Pathman, Neofetch and Docker for rootless mode
- Monitoring services and tools like Htop, Iftop, Btop, Ncdu, etc.
- Networking tools like Aws, Curl, Wget, Nftables, Ncurses, Socat, Whois, etc.
- File Editors like Git, Vim, Nano, Neovim, Lazygit, Ripgrep, Diff, Patch
- Many other common unix tools, C compilers, and devel libraries
Post-Installation
Here's what you need to do after installing the software:
Have a domain and a public IP
Please assign atleast an IPv4 public IP address. Having IPv6 is recommended as our software all supports IPv6.
Then, please have a domain that will be set as the bridge API, then add A + AAAA records of your server. This domain should not be in the root/apex, because it's for your internal access, like sgp.domcloud.co not domcloud.co.
If you don't have a public IP address or you're just running the whole VM behind NAT on your PC, please have a domain and install Cloudfare Zero Trust HTTP Tunnel to port 80 inside the VM.
Check Virtualmin Configuration
Go to https://<your bridge api domain>:2443 and log in with user root. Please make sure you're visiting it as https and not http. Ignore the certificate warning.
- Finish the post installation wizard
- Go to
Virtualmin->System Settings->Re-Check Configuration
Re-Checking configuration is important for Virtualmin adjusts to your new server, like saving records of actual IP addresses of it.
If you forget the webmin root password, please run this in root SSH:
/usr/share/webmin/changepass.pl /etc/webmin root YourNewPasswordfor Ubuntu (change YourNewPassword)/usr/libexec/webmin/changepass.pl /etc/webmin root YourNewPasswordfor Rocky (change YourNewPassword)
Assign the bridge API website to a domain
You need to assign the bridge API to a domain before it can be connected. Please assign A/AAAA of your domain to IP address of your server. If you use Cloudflare, please turn off the proxy. The bridge API website by default is localhost, you need to change that.
Let's say you have a mysite.com domain, we'll assign bridge API to bridge.mysite.com by setting A+AAAA record to your VPS. The bridge. subdomain is important since you can want to host an actual website to mysite.com not the internal bridge API.
After setting the DNS records correctly, open the Virtualmin UI at https://bridge.mysite.com:2443 (note the HTTPS part!). Ignore the certificate warning for now.
Then go to the site > Manage Virtual Server > Change Domain Name.
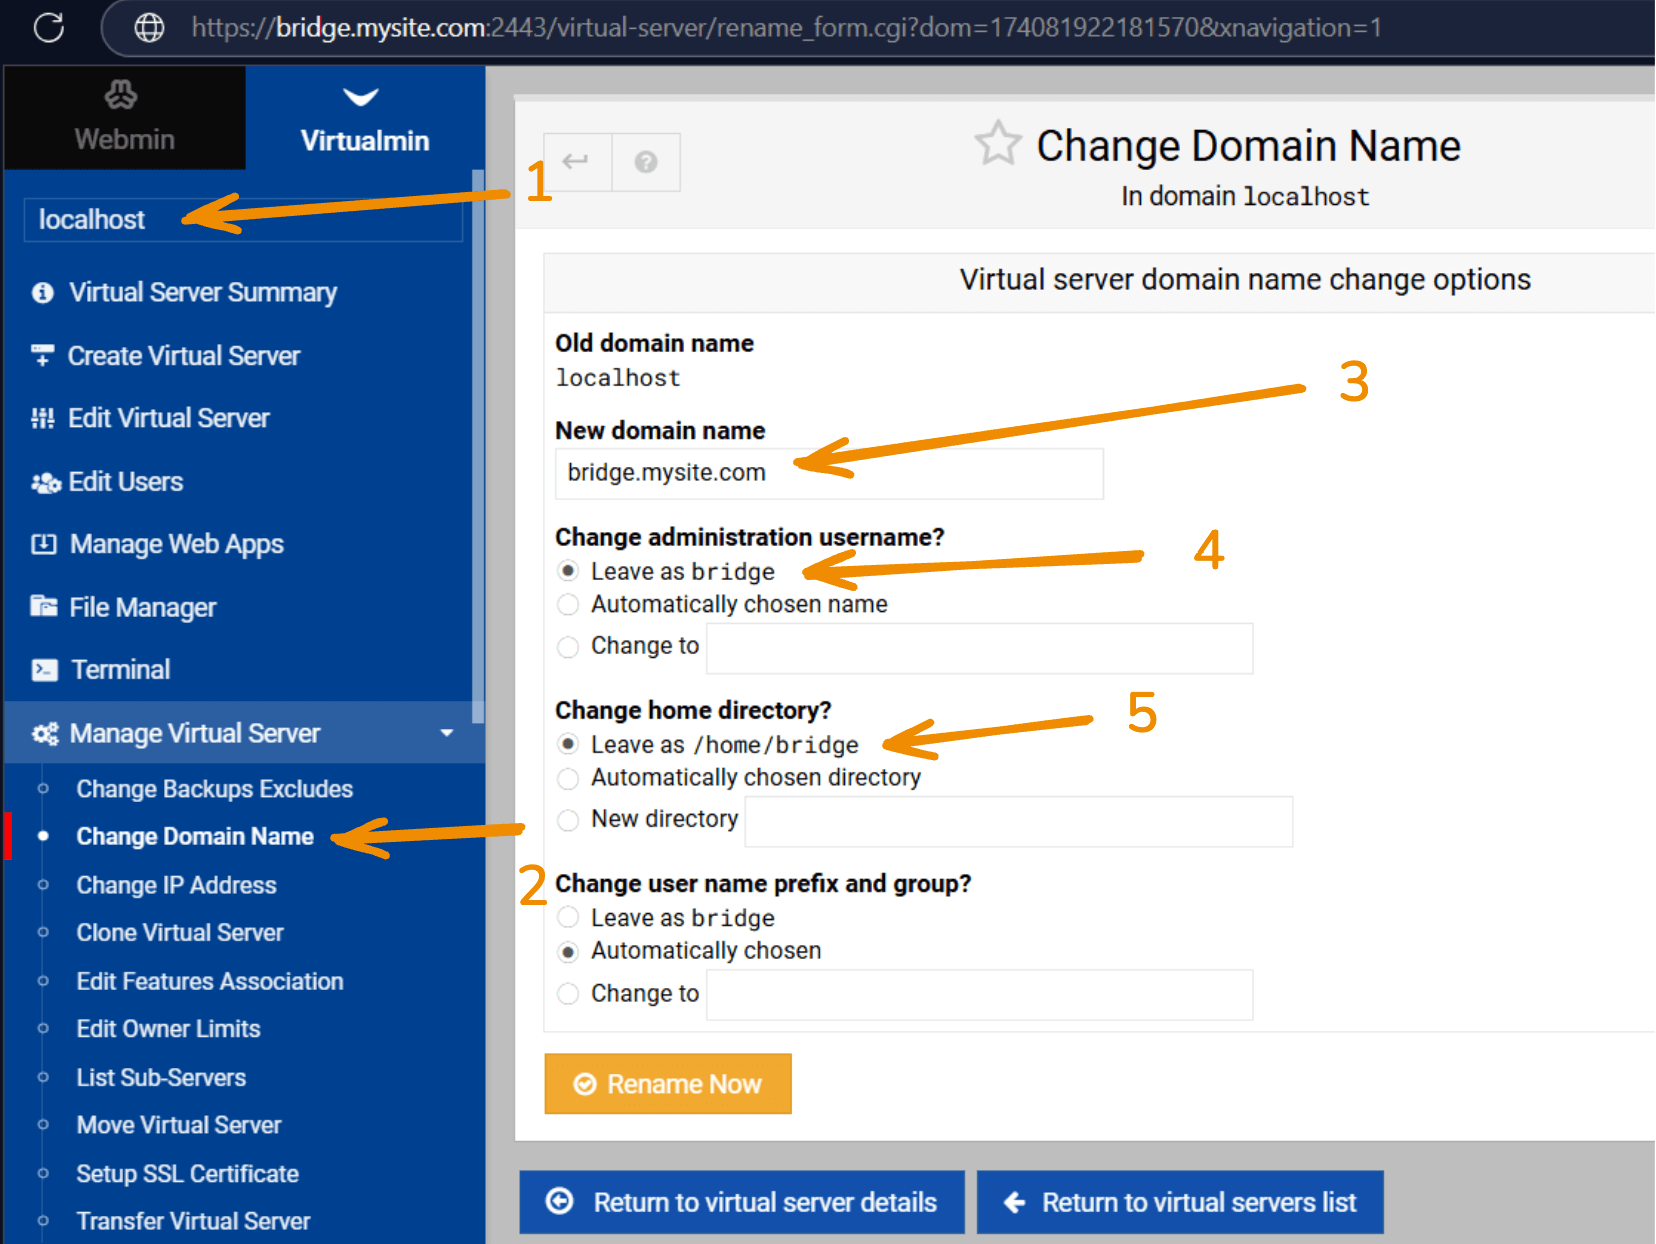
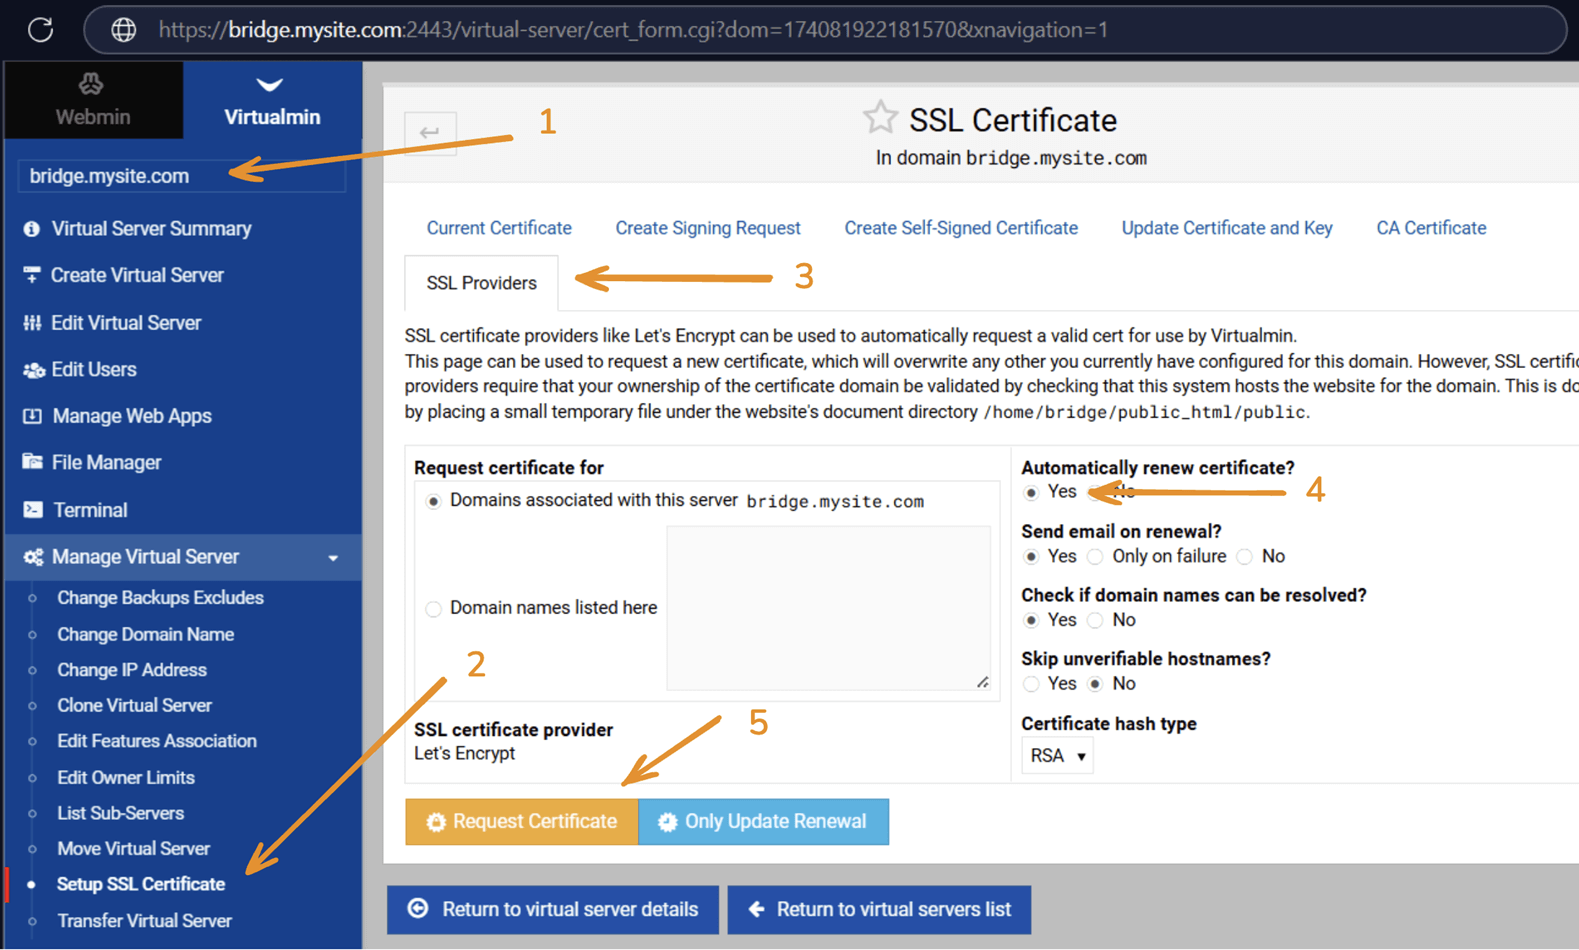
After that, go to Setup SSL Certificate to get SSL Valid
If you get error saying The ACME server believes [email protected] is an invalid email address. Please ensure it is a valid email and attempt registration again, please fix your hostname and restart webmin in SSH and retry.
hostnamectl set-hostname bridge.mysite.com
systemctl restart webmin
To apply the SSL to webmin, go to Tab Current Certificate and click Copy SSL Certificate to Services and Set as Default Services Certificate.
Working with Disk Quotas
Linux disk quotas is essential to make storage size calculation works. We recommend you to use XFS for all disks and have a separate disk in /home for easier disk management.
If you're already in XFS and using Rocky Linux, add usrquota,grpquota on the /etc/fstab to apply quotas for secondary disks. For root disk, use the following command and restart:
grubby --update-kernel=ALL --args="rootflags=usrquota,grpquota"
Other than that, we posted some solutions to common problem about disks here:
- How to Change root partition from EXT4 to XFS without changing boot disk
- How to Extend LVM Boot Partition on Oracle Cloud
Add your server to DOM Cloud Portal
Add your server to our portal here, it's free. After that, you can create servers with your own self hosted server.
Is there any info about the bridge API?
The Bridge API is an open source headless API mainly for communication with DOM Cloud Portal. If you need a frontend to manage your server like a cPanel, it is already installed and it's called Virtualmin — the one you're accessing with at port 2443.
The Bridge API recently has a Swagger documentation and you can check it online via one of our cloud servers. The Bridge API mainly protected using SECRET .env as a Bearer token.
What If I need to ask?
You can ask me if you found problems within installation scripts.
If you want to ask me to set it up for you, that will comes with upfront fee of 100 USD per server. It includes any software that you want to install.