App Daemon
Our server uses NGINX as the reverse proxy for HTTP and HTTPS and it is used to serve static files and proxy requests to your app. Configuring NGINX is a must so we know how to handle your website.
Our NGINX is ran as a system-level daemon. To improve security, all of your content is run as a non-sudo user. Also, we only allow a limited set of NGINX features available to customize. The only way to customize it is via the deployment system.
If you never heard NGINX before, you can read some of good resorces here:
You can either edit NGINX config directly or via our interactive form.
Editing NGINX config directly
Editing NGINX config can be performed via Check -> Check NGINX.

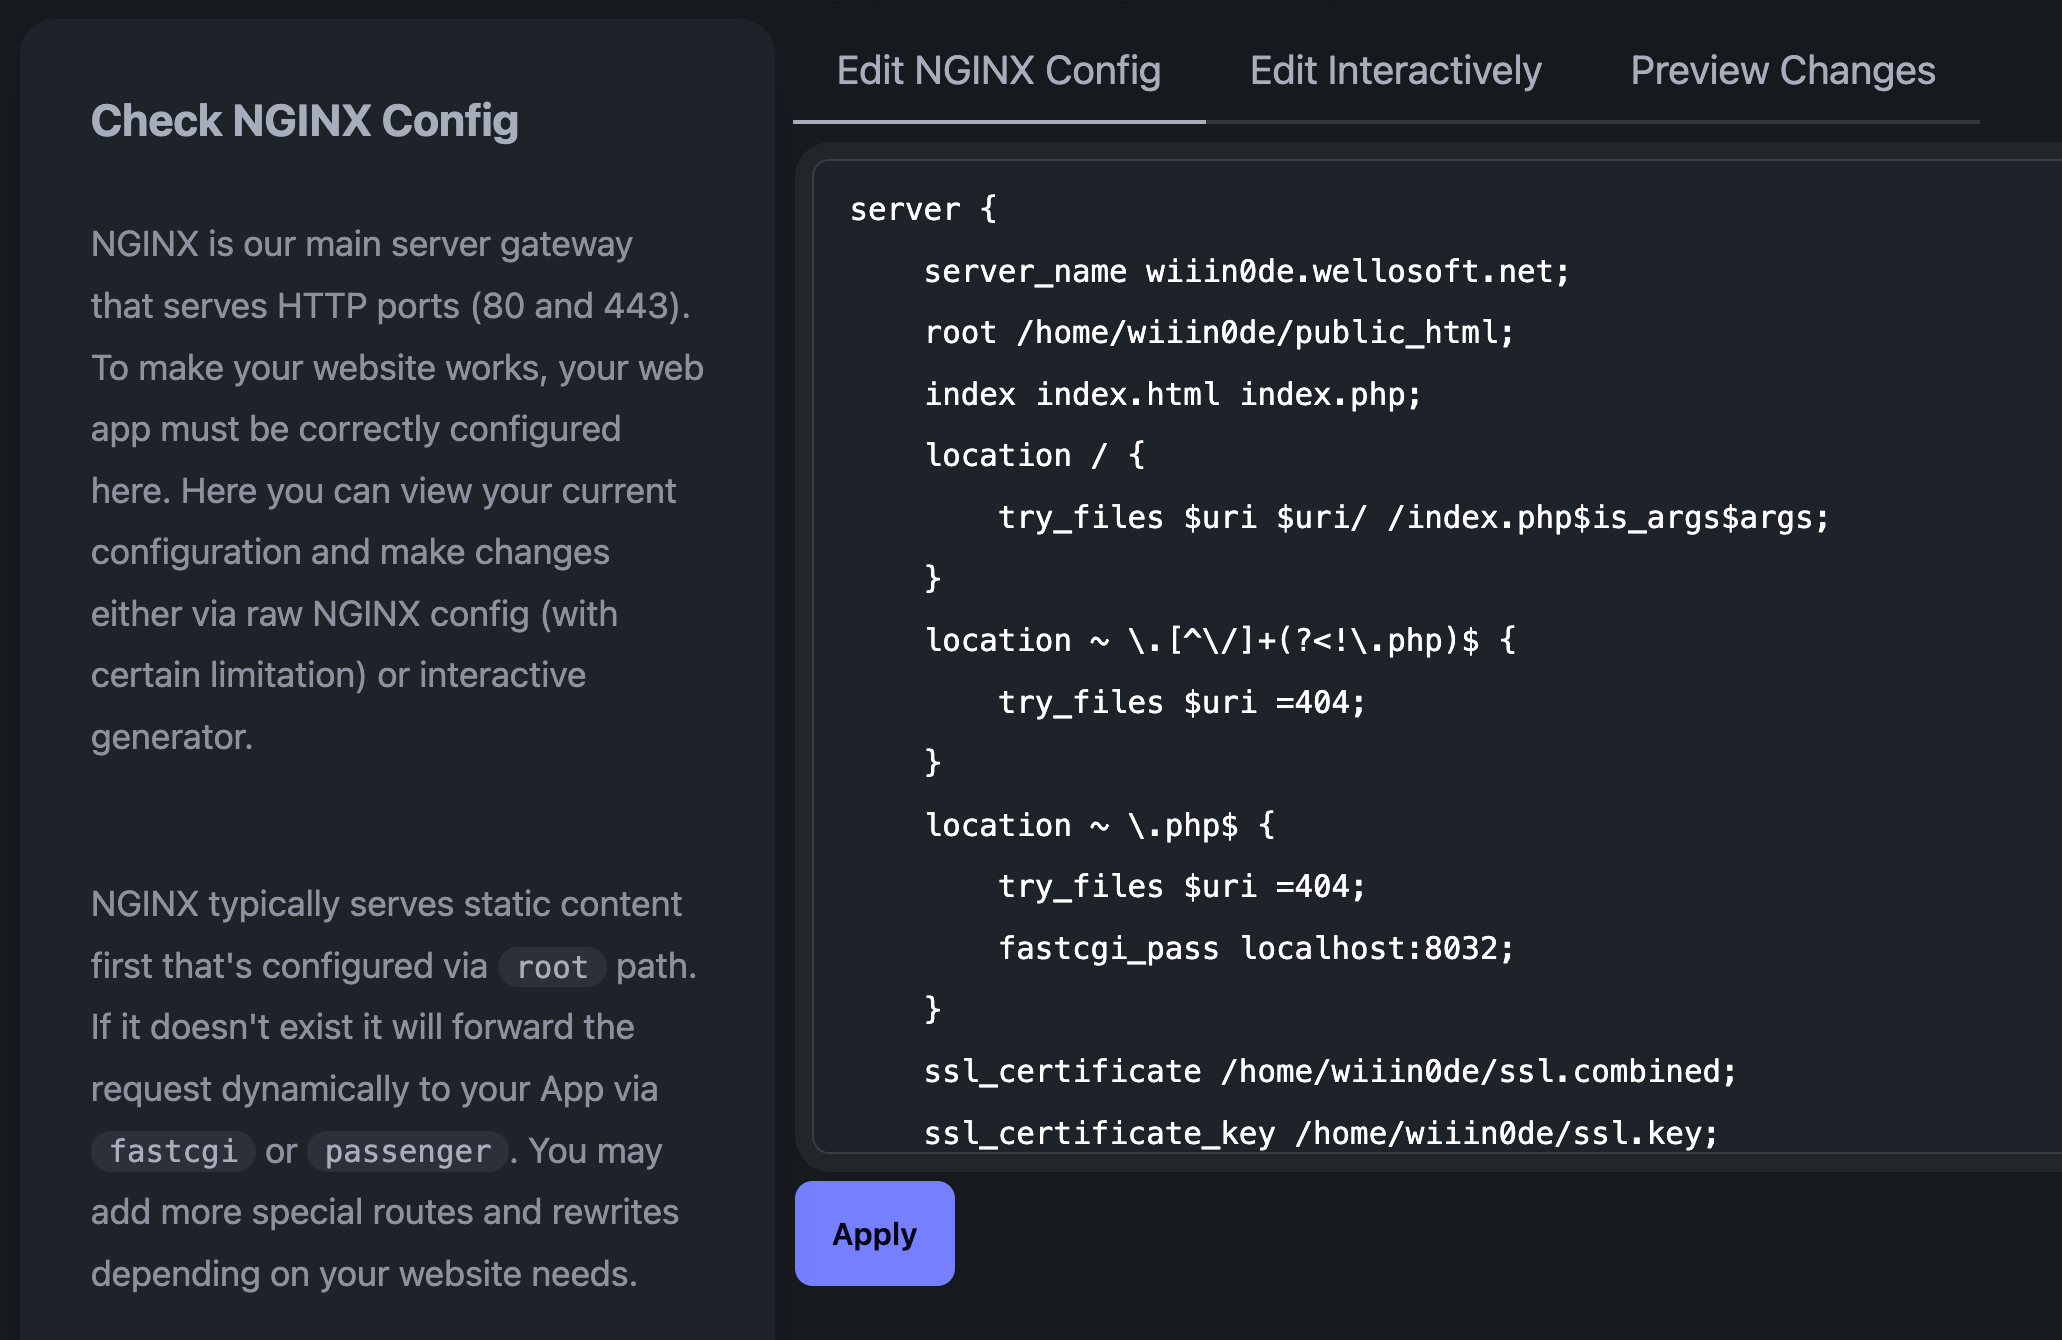
The text area contains current NGINX script and you can freely edit it. When you click Apply it will convert your changes to deployment script like this:
nginx: |
  server {
    ....
  }
Behind the scene it will convert your input to YAML script represented in our NGINX deployment script reference hence you won't be able to change certain protected values such as IP addresses, PHP proxy pass, etc.
Editing NGINX config interactively
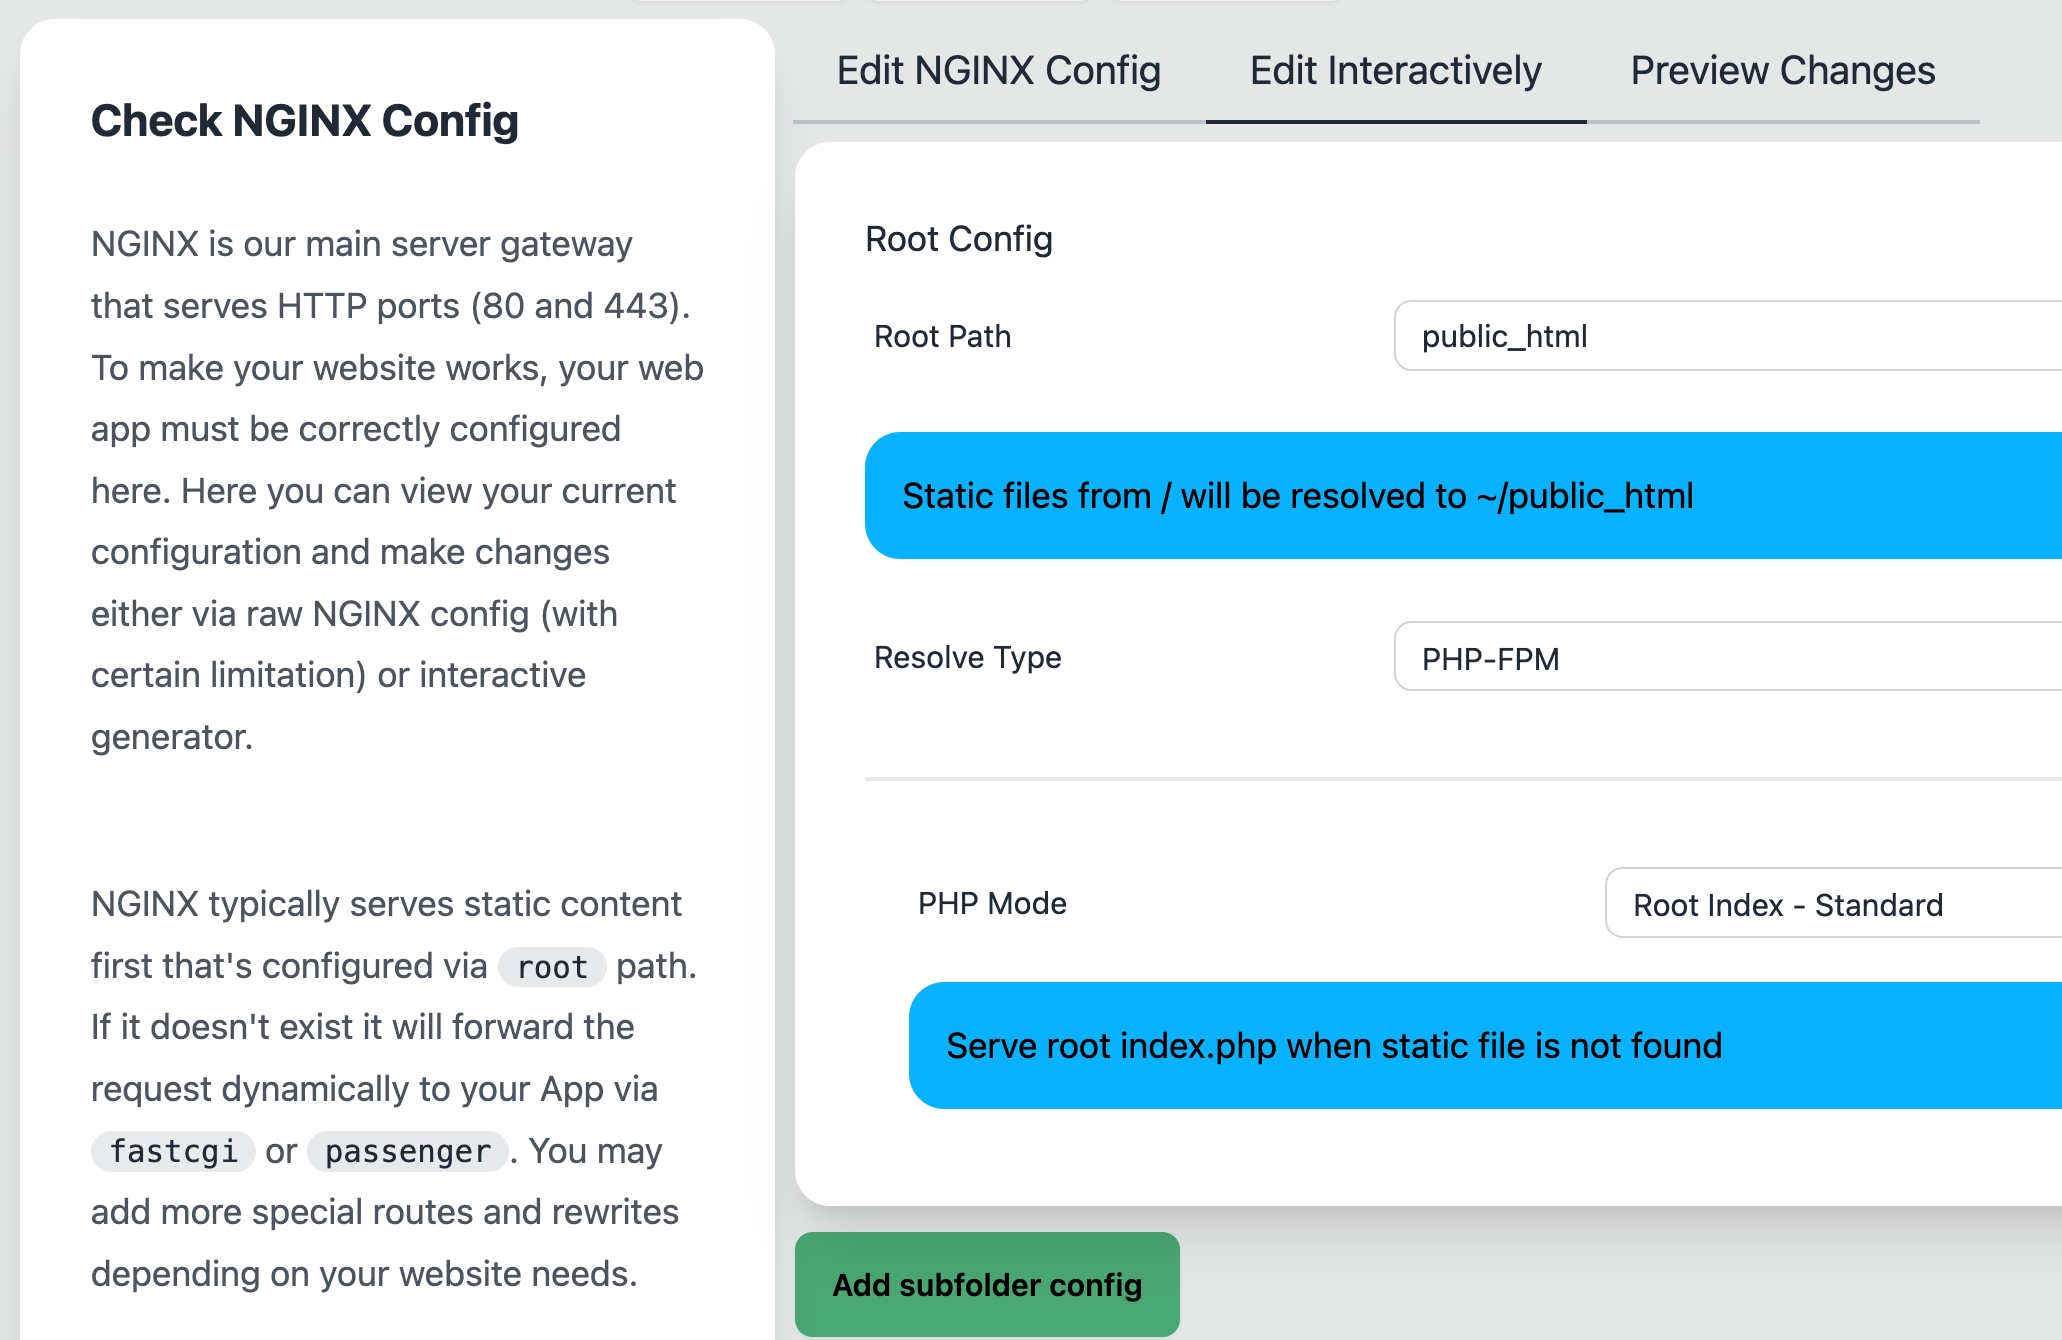
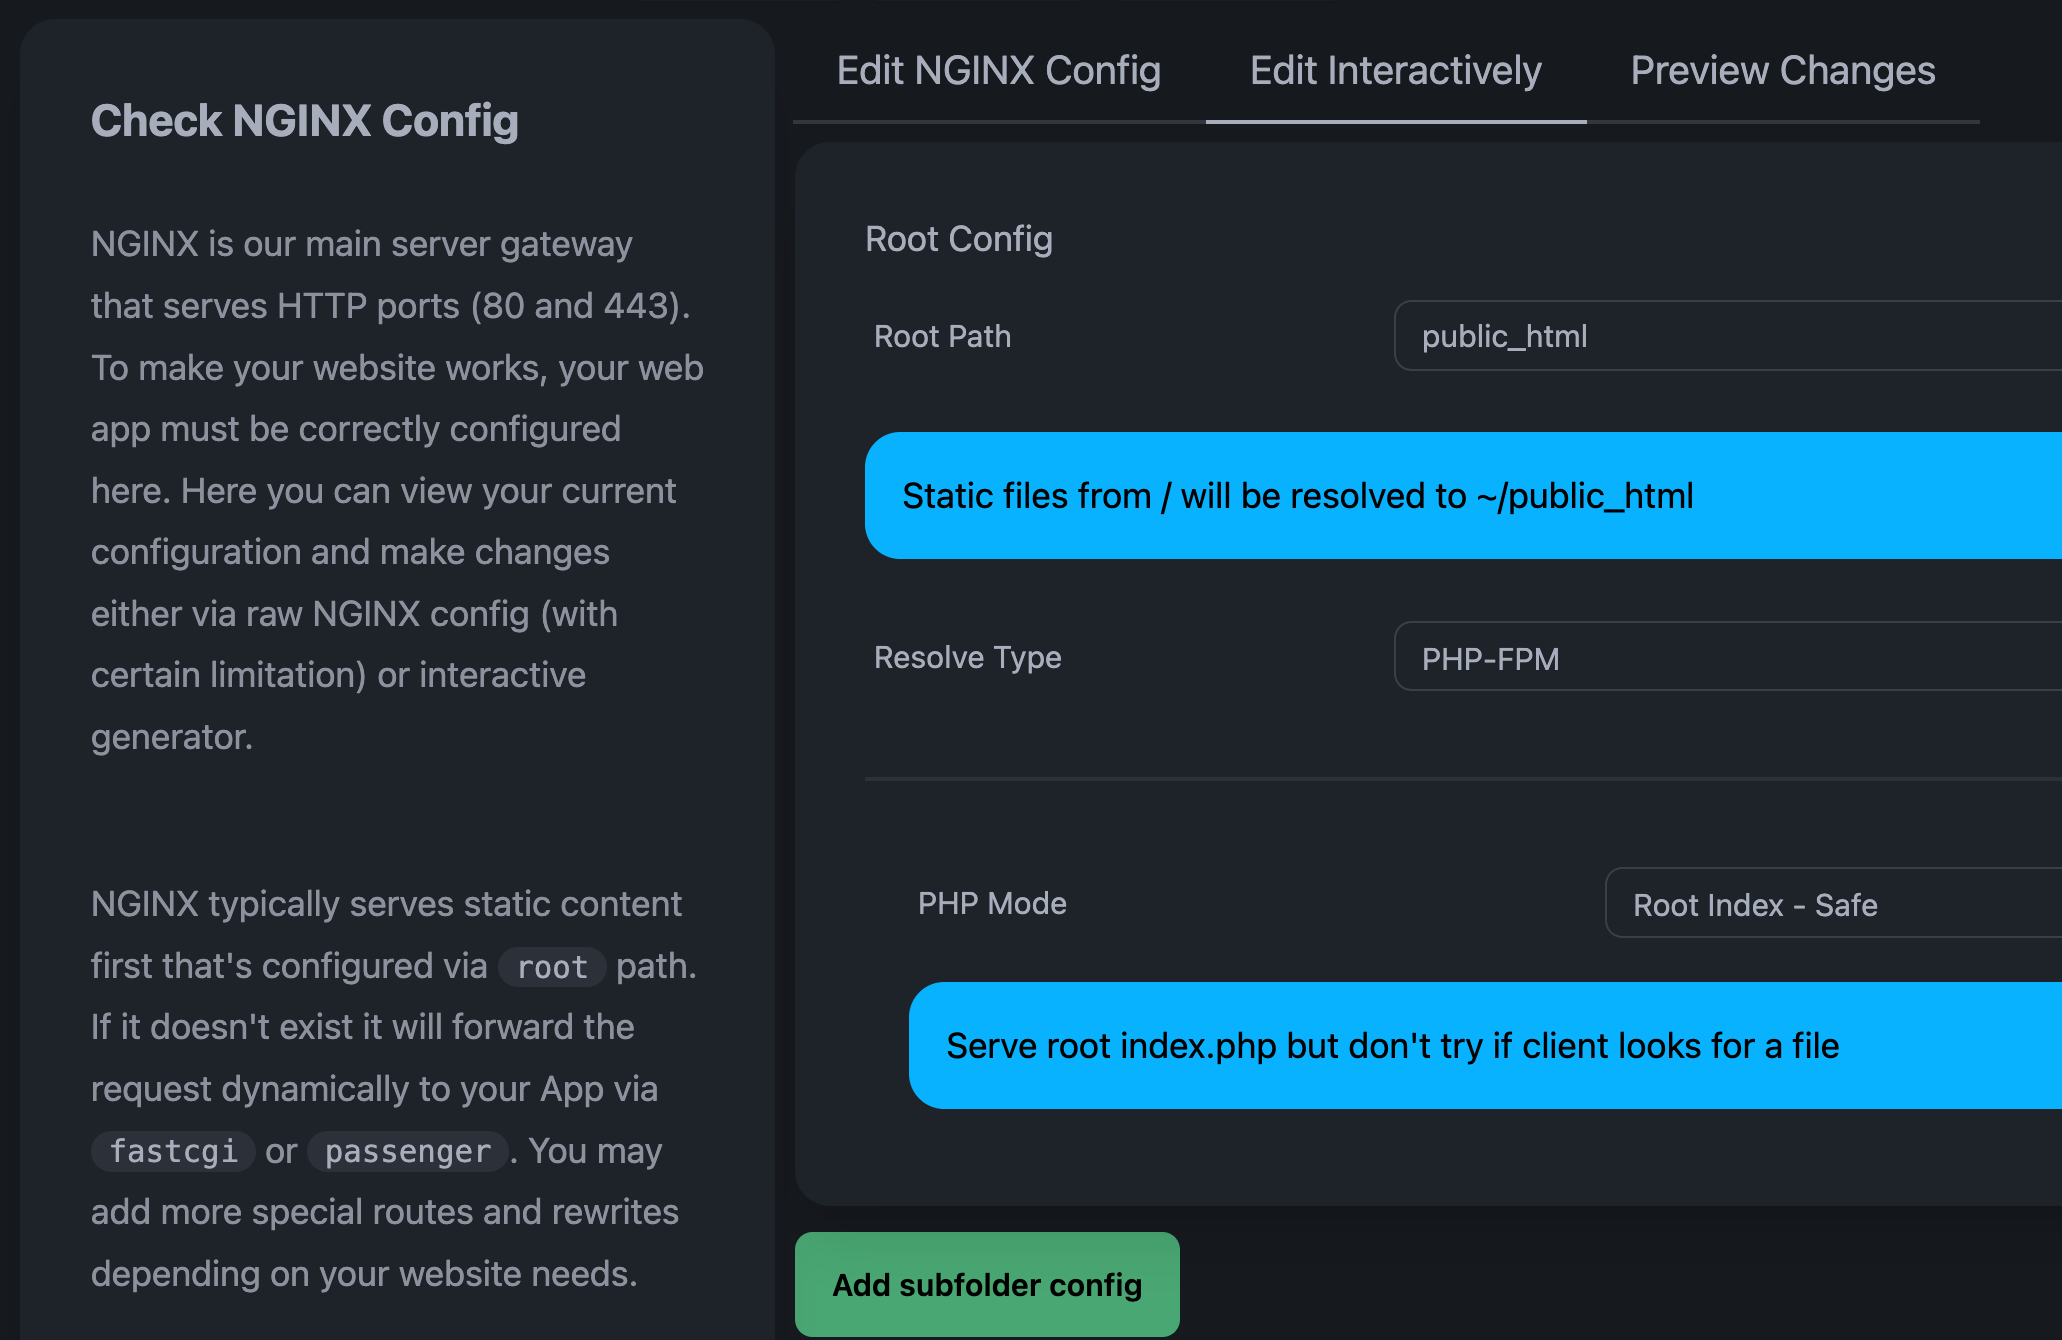
The interactive NGINX config contains easy-to-read NGINX config that covers about 80% of usage for popular frameworks. When you use it will convert your form to a YAML script represented in our deployment script. The prefilled form shown represents the current config of your website.
Beware! Changing NGINX config this way may erases your customized NGINX config that cannot be represented using the form.
| Option | What is it? |
|---|---|
| Root Path | The directory where NGINX searches for static files before being forwarded to app |
| Cache Expiration | The static files cache expiration settings |
| Resolve Type | What is the kind of your app? |
| - Static | No app, just HTML files |
| - PHP-FPM | PHP Handled by fastcgi_pass |
| - Phusion App | Special handling for Node.js/Python/Ruby apps |
| - Generic App | Any kind of app (Traffic forwarded via $PORT arg/envar) |
| - Forward Port | Forward to hardcoded/docker/unit port via proxy_pass |
| - Deny Requests | Deny all requests (useful for subfolder config) |
The PHP-FPM mode has some useful preset
| Option | What is it? |
|---|---|
| - Smart | XAMPP-like webpages (hide .php extension) |
| - Root Index - Safe | Route all extension-less pages to /index.php |
| - Root Index - Standard | Route all pages to /index.php as REQUEST_URI |
| - Root Index - Always | Route all pages to /index.php as PATH_INFO |
Please refer to PHP deployment setup for each of security implication.
The Static mode also has some useful preset below and a way to configure custom 404 page.
| Option | What is it? |
|---|---|
| - Default | Nothing special |
| - Smart | Allow hiding .html extension |
| - Root Index | Route all pages to /index.html (Treats all as 200 OK) |
| - Auto Index | Allow listing directory and expose all file lists |
Editing NGINX Config via YAML Script
Below is the example of the configuration:
nginx:
  fastcgi: 'on'
  root: public_html
  index: index.html index.php
  ssl: 'on'
Please see NGINX deployment script reference for advanced configuration that we can offer.
Configure NGINX for HTTPS
The ssl option has three options: always, on, off. The always option will force the server to redirect all HTTP traffic to HTTPS. The default value for ssl is on.
Configure NGINX for PHP
The fastcgi option has three options: always, on, off. The default value for fastcgi is off.
This section is covered more in the PHP Deployment section.
Configure NGINX for Generic Apps
NGINX by its own only forwards connection and can't invoke the desired app to run. That's why we use Phusion Passenger so it can tell NGINX to invoke the app and forwards HTTP requests.
The minimum configuration to enable NGINX for Generic apps is:
nginx:
  root: public_html/public
  passenger:
    enabled: on
    app_start_command: npm start
... which is equivalent of running npm start before HTTP traffic gets forwarded. The app started in the parent of root
(public_html/public) by default to prevent leaking unintended files. The app started with $PORT envar set and this app is
expected to serve HTTP requests at PORT.
Passenger's enabled: on config is required to indicate that Passenger's module is activated for given host. It's required.
If the app must be called from another directory, you can use the app_root option to specify the directory that contains the app. For example, if the main app file is in public_html/server/app.js, you can set the app_root to public_html/server:
nginx:
  root: public_html/public
  passenger:
    enabled: on
    app_root: public_html/server
    app_start_command: node app.js
PORT environment variable
The PORT environment variable is set by Phusion Passenger. It is a random port that's chosen as a HTTP proxy between your app and the internet.
You can tell the app to listen to this port with another envar name using env like this:
nginx:
  passenger:
    app_start_command: env HTTP_PORT=$PORT node app.js
Or you can set the port using the app's argument if available:
nginx:
  passenger:
    app_start_command: node app.js --port $PORT
If you have designed your app to listen to PORT envar, leave it all alone:
nginx:
  passenger:
    app_start_command: node app.js
All examples here assume your app listen to IPv4 loopback (i.e. 127.0.0.1),
not IPv6 loopback such as localhost or ::1. Passenger expects your app listening to IPv4 loopback port.
For example in Rust, you might have to specify it like env TARGET=127.0.0.1:$PORT cargo run.
Set Environment Variables
Passenger has three ways to set environment variables:
app_env option
The app_env option is special option that's used to set environment mode. The default value is production. This option sets the value to the following environment variables:
RAILS_ENVRACK_ENVWSGI_ENVNODE_ENVPASSENGER_APP_ENV
You can set this value other values such as development or test.
env_var_list option
The env_var_list option is used to set environment variables directly from NGINX. It's a list of environment variables to set. The value is a string that's in the format of KEY=VALUE. For example:
nginx:
  passenger:
    enabled: on
    app_start_command: node app.js
    env_var_list:
      - APP_SECRET=SECRET_VALUE
      - APP_CONFIG={"key":"value"}
~/.bashrc file
Passenger reads the ~/.bashrc file to set environment variables. You can set environment variables in this way. For example run this command to edit the ~/.bashrc file via SSH:
nano ~/.bashrc
Then add the following line to the file:
export APP_SECRET=SECRET_VALUE
The environment variable will be set when the app is started next time.
More information about setting environment variables can be found in the Passenger documentation.
Restarting App
Any edits either in the app file or ~/.bashrc file will not be applied until the app is restarted. You can restart the app forcibly by running restart in SSH, which will actually calls:
killall -u $USER
The alternative way to restart app can be found in the Passenger documentation. Global NGINX Reload will also restart your app unless you're using Proxfix NOHUP.
For some connection using Node CJS, Python WSGI or Ruby config.ru, you may need to restart by passenger-config restart-app ~. We have some reports restarting don't work with restart alone.
Websocket
Websocket should works out of the box since only one app is spawned per website configuration. However, The websocket disconnects if NGINX reloads as of websocket sessions data lost in memory. To retain memory data after NGINX reload, use Proxfix NOHUP
Proxfix NOHUP
proxfix NOHUP mode is a custom made proxy app designed to overcome Phusion limits during NGINX restarts. To setup proxfix NOHUP mode, prefix your app start command with proxfix with NOHUP=1 envar like below:
nginx:
  passenger:
    enabled: on
    app_start_command: proxfix node app.js
    env_var_list:
      - NOHUP=1
proxfix will call node app.js outside from NGINX tree. So, when NGINX restarts, your app will not killed, it retains it's memory. NGINX simply calls proxfix who then proxies NGINX requests to your already-running app.
This has a downside that if you change NGINX properties, it will not be restarted -- You must call restart to really restart it. You also still need to consider if your app to recover even if it has restarted abruptly.
Proxfix TARGET
proxfix can help to overcome phusion limitation where if your app PORT can't be customized.
nginx:
  passenger:
    enabled: on
    app_start_command: proxfix node app.js
    env_var_list:
      - TARGET=127.x.x.x:2345
This will forward traffic to your backend at configured TARGET.
X-Forwarded-For and X-Forwarded-Proto
Passenger will always add X-Forwarded-For and X-Forwarded-Proto to give the app client IP addresses and HTTP scheme.
To determine client IP address or HTTP scheme reliably, you have to know how many layers of proxy needed to reach your site.
For example, this is the example of response headers from user IP 123.45.67.89 when there's no proxy via HTTPS.
x-forwarded-for: 123.45.67.89
x-forwarded-proto: https
If the user is same but you're under a webproxy such as CloudFlare (assume IP 32:231::1), then it would be like this
x-forwarded-for: 123.45.67.89, 32:231::1
x-forwarded-proto: https, http
The X-Forwarded-Proto is equally important to determine whether you should send a secure or plain cookies. This mean your app must be configured to trust proxy headers. Some framework may already do it, some other need be set explicitly.
HTTP-3 and QUIC
To enable HTTP/3, turn the HTTP version to 3 in the deployment system
features:
- http 3
This enables many enhacements related to HTTP 3 such as Multiplexing and QUIC protocol, resulting in much faster page performance especially on smartphones.
You tipically won't see HTTP 3 used after changing this since browser caches Alt-Svc for about 24 hours. To see the change, you need to open Incognito mode. After few refreshes, you'll see it will use h3. You can also check if HTTP3 working by using third party tools like https://http3check.net/.
What about HTTP/2? We do not support it due to how NGINX handles it ALPN algorithm. We can't individually either toggle it on or off at each site. Anyway, HTTP/2 suffers some major drawback that HTTP/1.1 can be seen faster in some cases.
TLSv1.3
Our NGINX is configured to accept TLSv1.3 only by default, for stronger HTTPS security and lower TTFB (Time for first byte). TLS v1.3 is introduced in 2018, a 10 years gap from TLSv1.2 which introduced in 2008. TLSv1.3 sets minimum browser requirement to be fairly new, but we believe 95% browser coverage as of 2025 should be no problem.
If you need to enable TLSv1.2 because of IE11 support or your webhook providers requires it, please move to x64 servers or use Cloudflare Proxy.
Static File Caching
Static file caching is enabled by default for media, CSS and JS files. This is done by sending Expires header to the browser, so browser will cache your static files without checking it with any HTTP calls until the specified time.
The default the Expires header is set to 7 days. To disable it, set expires to off, like this:
nginx:
  # .... the rest of nginx setting ....
  expires: off # default is '7d'
Note that this doesn't stop E-Tag header -- so when files unchanged, NGINX will send 304 Not Modified. Also, you still need to force browser refreshing the CSS / JS files if that browser has visited your site with old expires setting.
To force browser refreshing the CSS / JS files, perform a hard reload.
If a hard reload doesn't work for you and you're using a proxy service such as Cloudflare CDN Proxy, you have to purge their cache. Please purge only after setting the expires value to off so you don't have to repeat it later.
Language-Specific Configuration
More information about configuring NGINX for specific languages can be found in the Deployment section.
Advanced Configuration
All other available options are specified in Deployment System section.
Global Configuration
Global configuration of NGINX cannot be changed. However, some of the configuration are set as optimally as possible. You can see more about the global configuration in the file. Some of the interesting configuration are:
- Static files are cached with
7dexpiration time by default. - Gzip are enabled for many static files for size with >1000 bytes.
- Maximum file upload size is set to 4GB.
- There's rate limit of 100 requests per second with 6000 burst request per server name to mitigate DoS attack.
- TLSv1.2 is the minimum HTTPS version to support, which works for browsers as old as Windows 7 era (with IE 11), older browsers such as in Windows XP era will not be able to open your website.